Kafka protocol practical guide
I worked with the Apache Kafka protocol on the low level quite a bit. It wasn’t easy to start doing this following the official guide only and I read the code a lot. With this post, I want to give you a head start by guiding you step by step from primitive values to meaningful requests.
In this post:
- Explore the Kafka protocol code and the protocol in action with Wireshark.
- Learn how to read and write primitive values.
- Combine primitives to perform meaningful requests.
We will use Python as the programming language. However, the code will be zero-dependency and easily portable to the language of your choice.
Intro
Apache Kafka has a custom binary protocol that is versioned, with various data types, optional fields, etc. Unfortunately, it doesn’t use a well-known serialization format like Protobuf. The protocol message schema is described in JSON. The actual Java code that does serialization and deserialization is generated from this description.
When you’re in the Java world, you can use the official client library. But if you’re using another platform, you’re relying on third-party implementations. They exist, but they’re focusing mostly on the producer and consumer, rarely on some aspects of the admin client. If you need to do something else, you’re on your own.
This post will help you start hacking on the Kafka protocol. (If you are looking for a ready Python (de-)serialization library for the Kafka protocol, check out Kio1. For Rust, have a look at the library I’m working on.)
You can find the code from this post and some more like tests in this repository on Github.
Protocol overview
You can find the official protocol description on this page. I encourage you to familiarize yourself with it, at least read the “Preliminaries” and “The Protocol” sections.
Here are some highlights. The Kafka protocol is a TCP-based binary request-response protocol:
- TCP-based: the Kafka broker listens at ports on the TCP stack (which gives some benefits like ordering guarantees).
- Binary: messages are encoded in binary form and require special serialization and deserialization according to predefined schemas.
- Request-response: exchanges are initiated by the client, the server is passive and only replies to requests.
Each API message type consists of the request and response pair and is identified by a numeric value called the API key. For example, Produce and Fetch, the most characteristic Kafka RPCs, have API keys 0 and 1 correspondingly. Nowadays, there are close to 90 API message types (some of them are inter-broker, not client-broker).
Requests and responses are described by versioned schemas. Versioning allows for protocol evolution, for example, adding or removing fields or changing their data type.
First steps
Here are some things you can do to start working with the Kafka protocol.
Learn Kafka protocol code
The Kafka code is the source of truth (practically) about the protocol. Check out the Kafka code from Github and switch to the release you’re interested in (e.g. 3.8.0):
git clone [email protected]:apache/kafka.git
git checkout 3.8.0
You can find the API message definitions in JSON in clients/src/main/resources/common/message. Each JSON file contains the definition of one message2 type with all its versions. clients/src/main/resources/common/message/README.md gives a good overview of the schema definition format. Pay attention to stuff like default values, flexible versions, and tagged fields.
Apart from the concrete API message types you’re interested in, have a look at clients/src/main/resources/common/message/RequestHeader.json and ResponseHeader.json, which describe headers used in each request-response exchange.
Let’s run the code generator:
./gradlew processMessages
Now you can find the generated classes in clients/src/generated/java/org/apache/kafka/common/message.
Have a look at clients/src/generated/java/org/apache/kafka/common/message/ApiMessageType.java. This utility:
- describes the whole set of existing API message types along with their schemas and versions;
- maps API message versions to request and response header versions in the
requestHeaderVersionandresponseHeaderVersionfunctions.
Other files are one-to-one generated from the corresponding schema JSONs (sometimes with the Data postfix, it’s a compatibility thing). In these files you’ll find:
- The versioned schema definitions
SCHEMA_0,SCHEMA_1, etc. Sometimes schemas stay the same between versions. This is normal and means only the request-response counterpart changed. readandwritemethods where you can find the ground truth for the protocol serialization and deserialization.
Pay attention to the inner classes as well as they represent the complex structure of the message.
Run Kafka in Docker
Running Kafka in Docker is a convenient way to get a broker running to test the protocol or capture the network exchange. Since version 3.7.0, the Kafka team builds official Docker images, which you can run as:
docker run --rm -ti -p 9092:9092 apache/kafka:3.8.0
If you’re interested in older versions, search Docker Hub for other images. However, this may be not needed considering the Kafka protocol is backward and forward compatible: new brokers will recognize the old protocol versions just fine and the old clients can communicate with newer brokers.
If you read this, you probably already have the Kafka command line tools on your machine, but just in case, you can also run them in Docker. For example, run this to create a topic:
docker run --rm -ti --net=host apache/kafka:3.8.0 \
  /opt/kafka/bin/kafka-topics.sh \
  --bootstrap-server localhost:9092 --create \
  --topic test-topic1 --partitions 2
Inspect protocol with Wireshark
Having familiarized ourselves with the Kafka code, let’s look at the protocol in action. Wireshark is a widely used tool for such inspections. It can dissect the Kafka protocol (and supports the latest versions if your version is fresh enough).
I built Wireshark from sources of version 4.5.0, because my operating system package is old and not able to dissect Kafka protocol with new versions. Wireshark 4.5.0 should mostly support Kafka 3.7 protocol versions. However, you can try the available version and see how it works for you.
Let’s run Wireshark on the loopback interface with the port 9092 capture filter (1) and the kafka display filter (2):
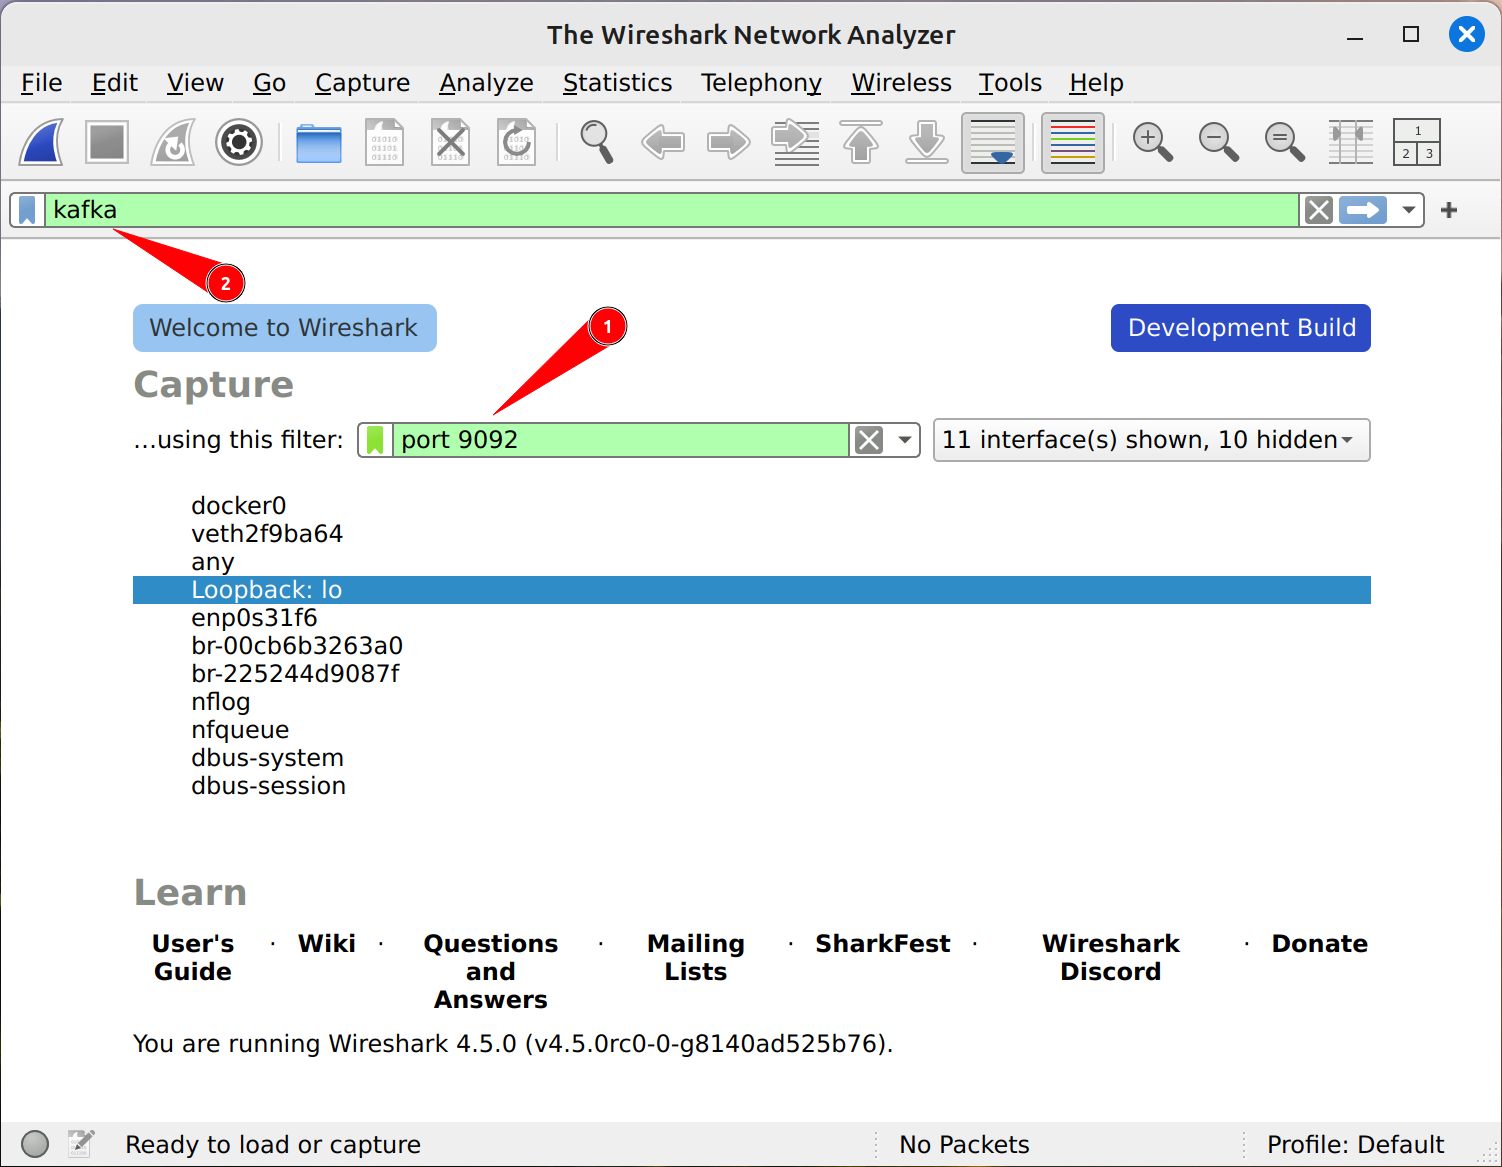
Starting a capture in Wireshark
Create a topic and see what Wireshark shows us:
/opt/kafka/bin/kafka-topics.sh \
  --bootstrap-server localhost:9092 --create \
  --topic test-topic1 --partitions 2
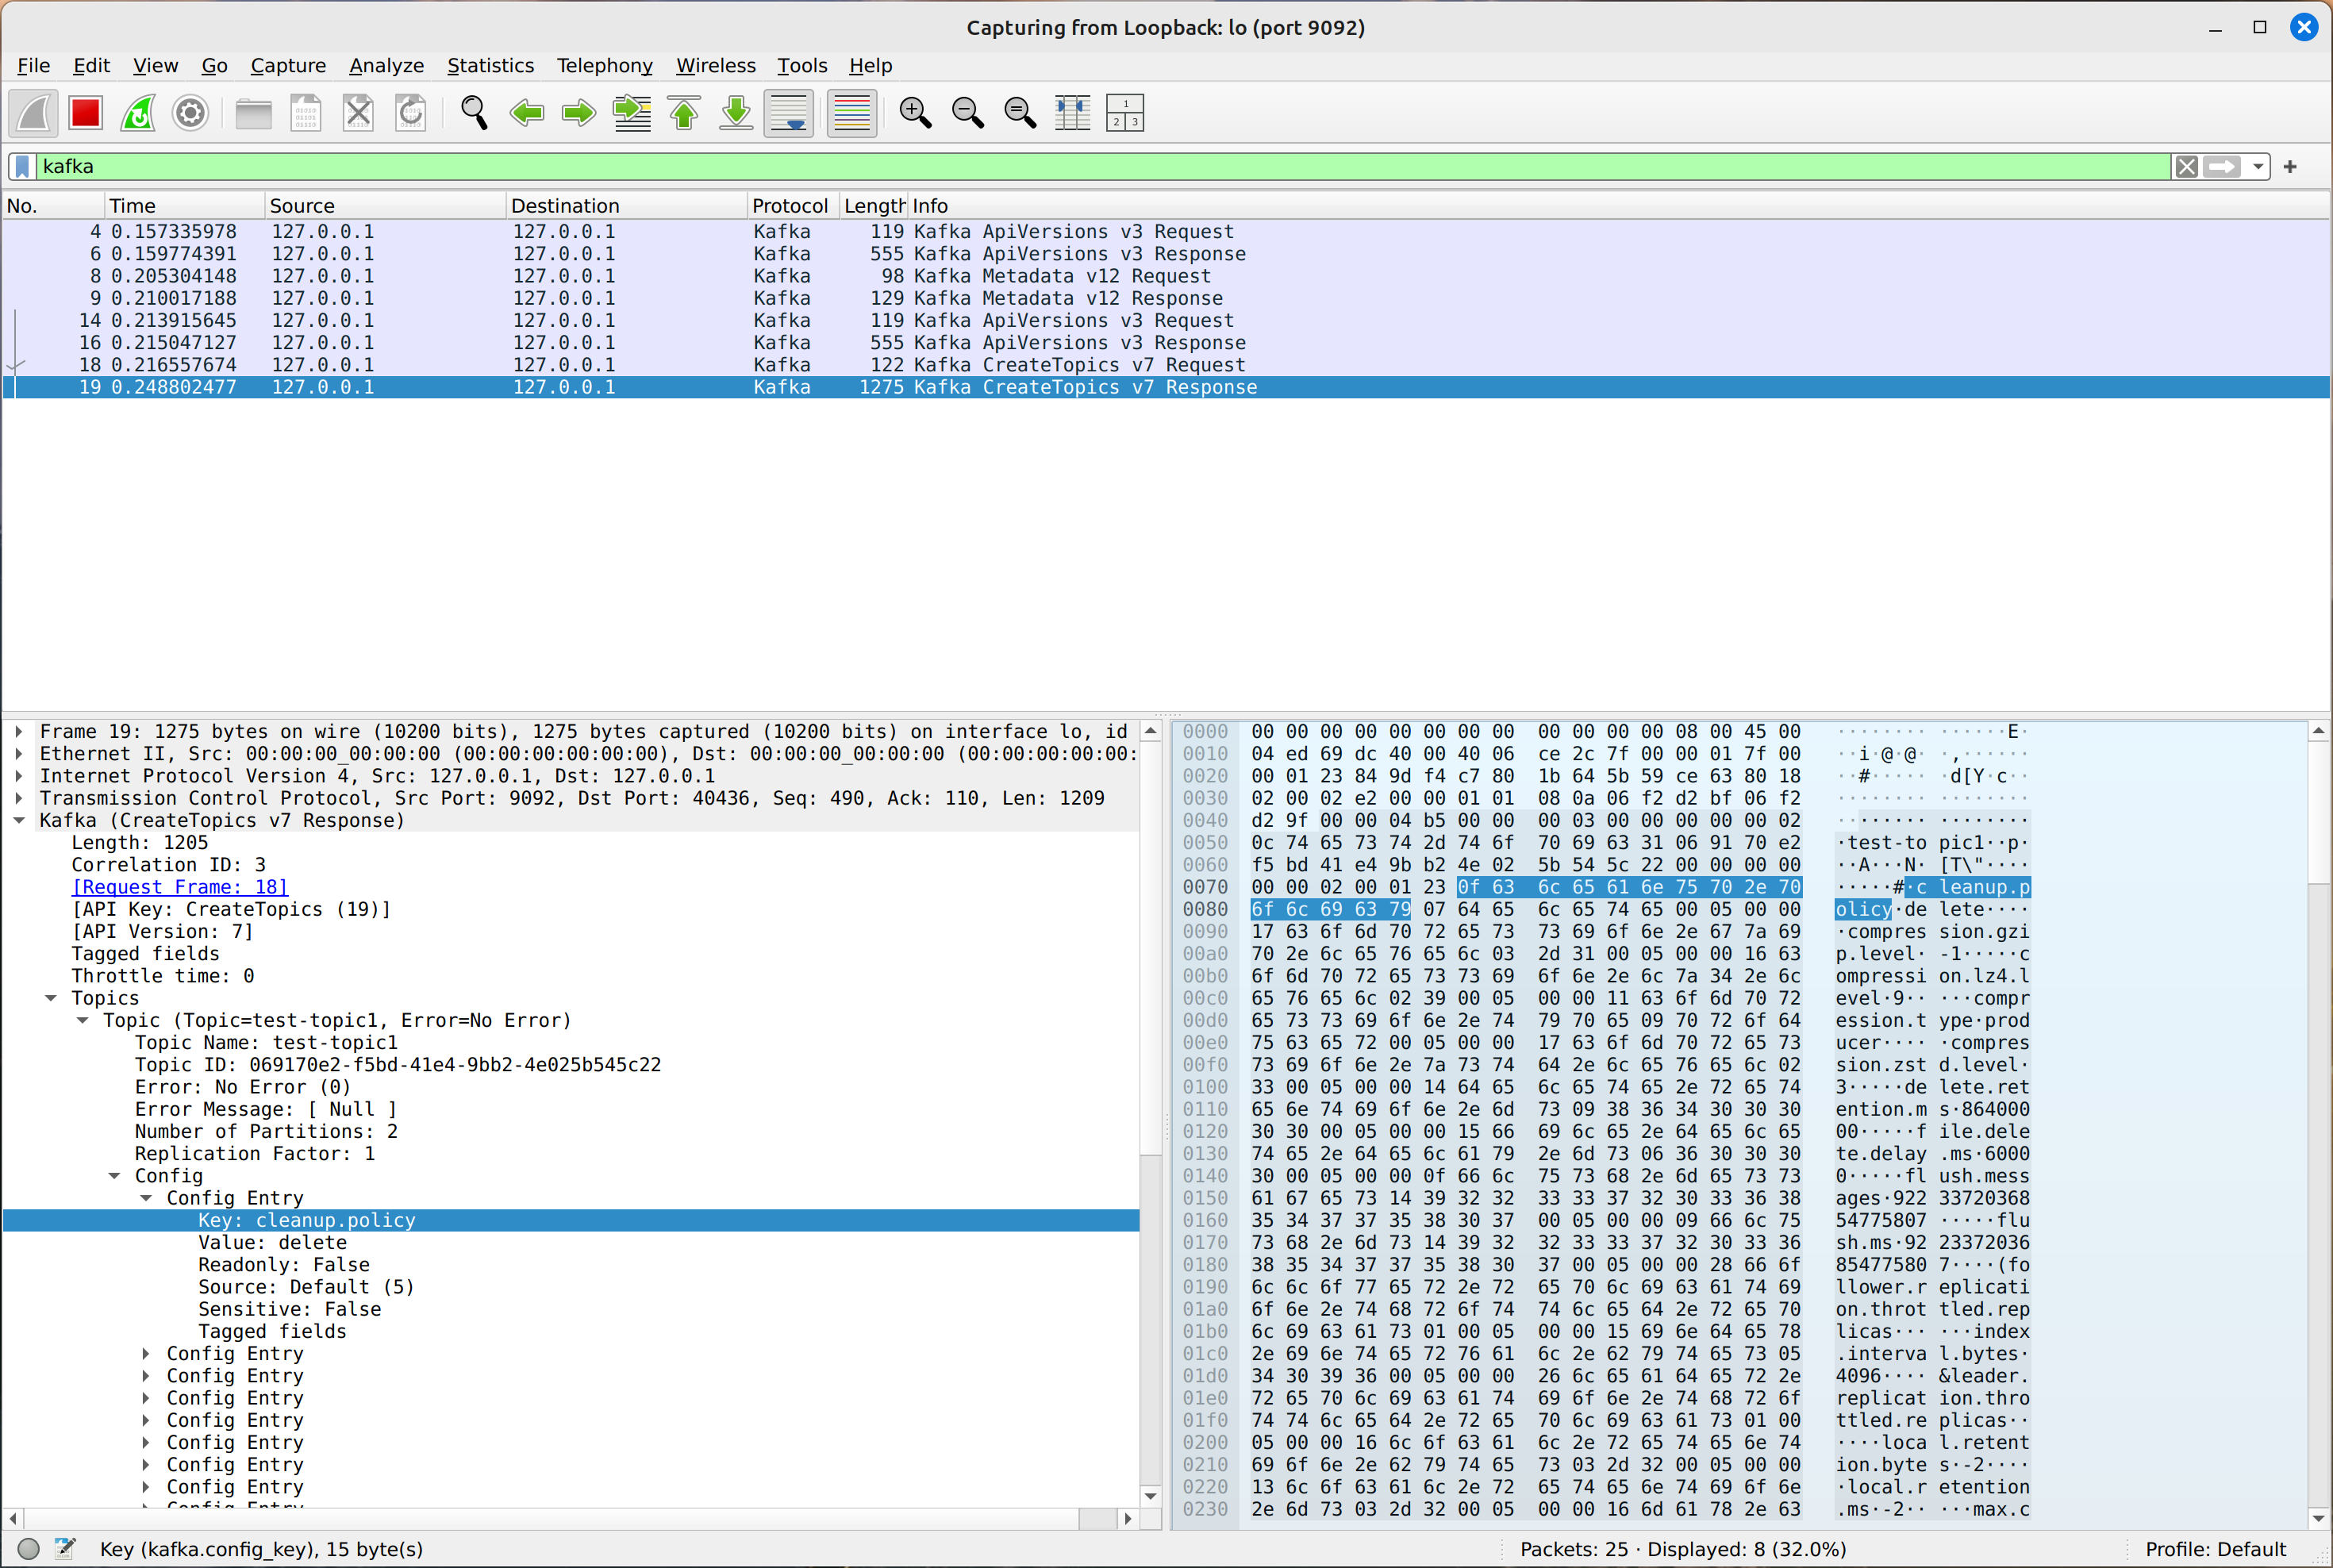
A create topic exchange between a client and a broker captured by Wireshark
The display filter removes everything irrelevant and leaves only Kafka requests and responses. As Wireshark understands most message versions in the protocol (depending on the Wireshark version, of course), you can conveniently look into the structure of each message. Wireshark will also show the corresponding bytes.
Wireshark is a great debugging tool that could help you understand how the protocol works in a particular case and what’s wrong with your implementation.
Reading and writing primitive values
The protocol defines a number of primitive types, which full description you can find here. Let’s implement the read and write code for them. You can find all functions in this file, also check out the corresponding test file.
Fixed length integer values: INT8, INT16, INT32, INT64, and UINT16
These are integer numbers with known fixed length: 1, 2, 4, or 8 bytes. Naturally, you can find such fields a lot throughout the protocol. In this class you may see how (trivially) their reading and writing are implemented in Kafka.
Let’s first define the function for reading an exact number of bytes from a buffer3:
def read_exact(buffer: BinaryIO, num_bytes: int) -> bytes:
    value = buffer.read(num_bytes)
    if len(value) != num_bytes:
        raise ValueError(f"Buffer underflow: expected {num_bytes}, got {len(value)}")
    return value
The BinaryIO type hint in Python represents an object from which bytes can be read and to which they can be written. It has methods like read, write, tell (for getting the current position), seek (for changing the position).
Now we can implement reading INT8:
def read_int8(buffer: BinaryIO) -> int:
    return int.from_bytes(read_exact(buffer, 1), byteorder="big", signed=True)
Kafka uses the big-endian (AKA network) byte ordering, hence byteorder="big".
Now writing:
def write_int8(value: int, buffer: BinaryIO) -> None:
    if -(2**7) <= value <= 2**7 - 1:
        buffer.write(value.to_bytes(1, byteorder="big", signed=True))
    else:
        raise ValueError(f"Value {value} is out of range for INT8")
I won’t repeat this for INT16, INT32, and INT64: the only significant differences are the number of bytes (2, 4, and 8 correspondingly) and checked ranges ([-(2**15), 2**15 - 1], [-(2**31), 2**31 - 1], and [-(2**63), 2**63 - 1] correspondingly).
UINT16 is similar to INT16:
def read_uint16(buffer: BinaryIO) -> int:
    return int.from_bytes(read_exact(buffer, 2), byteorder="big", signed=False)


def write_uint16(value: int, buffer: BinaryIO) -> None:
    if 0 <= value <= 2**16 - 1:
        buffer.write(value.to_bytes(2, byteorder="big", signed=False))
    else:
        raise ValueError(f"Value {value} is out of range for UINT16")
Note the signed=False here.
BOOLEAN
BOOLEAN is essentially INT8 with extra logic: == 0 means false, != 0 means true.
def read_boolean(buffer: BinaryIO) -> bool:
    return read_int8(buffer) != 0


def write_boolean(value: bool, buffer: BinaryIO) -> None:
    write_int8(1 if value is True else 0, buffer)
You can see an example of BOOLEAN in the allowAutoTopicCreation field of the MetadataRequestData generated class.
FLOAT64
FLOAT64 is a double-precision 64-bit IEEE 754 value. Python doesn’t have to_bytes and from_bytes for float like it has for int. So instead we will use the struct module from the standard library.
def read_float64(buffer: BinaryIO) -> float:
    return struct.unpack(">d", read_exact(buffer, 8))[0]


def write_float64(value: float, buffer: BinaryIO) -> None:
    buffer.write(struct.pack(">d", value))
>d means “a double value in the big-endian byte order”.
UNSIGNED_VARINT: Variable length integer values
Variable length integers are an approach that allows using of fewer bits per value when values are small. Kafka uses the varint approach from Protocol Buffers. The idea is simple:
Each byte in the varint has a continuation bit that indicates if the byte that follows it is part of the varint. This is the most significant bit (MSB) of the byte (sometimes also called the sign bit). The lower 7 bits are a payload; the resulting integer is built by appending together the 7-bit payloads of its constituent bytes.
You can check the Protobuf specification and Kafka implementation (read, write) for details.
This type isn’t used in the protocol fields per se, but it’s used for compact collections described below.
Let’s implement it. For confidence, we get some examples directly from the source of truth, Kafka’s ByteUtils class:
public class VarintCases {
    public static void main(String[] args) {
        for (Integer value : new int[]{0, 1, 127, 128, 129, 256, 1024, 100500, 9999999, Integer.MAX_VALUE}) {
            ByteBuffer buffer = ByteBuffer.allocate(5);
            ByteUtils.writeUnsignedVarint(value, buffer);
            System.out.printf("%10d\t", value);
            byte[] array = buffer.array();
            for (int i = 0; i < buffer.position(); i++) {
                System.out.printf("%s ", formatByte(array[i]));
            }
            System.out.println();
        }
    }

    private static String formatByte(byte b) {
        String result = String.format("%8s", Integer.toBinaryString(b))
                .replace(' ', '0');
        result = result.substring(result.length() - 8);
        result = "[" + result.charAt(0) + "|" + result.substring(1) + "]";
        return result;
    }
}
Running this, we’ll get:
         0  [0|0000000]
         1  [0|0000001]
       127  [0|1111111]
       128  [1|0000000] [0|0000001]
       129  [1|0000001] [0|0000001]
       256  [1|0000000] [0|0000010]
      1024  [1|0000000] [0|0001000]
    100500  [1|0010100] [1|0010001] [0|0000110]
   9999999  [1|1111111] [1|0101100] [1|1100010] [0|0000100]
2147483647  [1|1111111] [1|1111111] [1|1111111] [1|1111111] [0|0000111]
Let’s implement this in probably not the most performant, but a straightforward way:
def read_unsigned_varint(buffer: BinaryIO) -> int:
    result = 0
    # Go by 7 bit steps.
    for offset in [0, 7, 14, 21, 28]:
        byte = int.from_bytes(read_exact(buffer, 1), byteorder="big", signed=False)

        # Concat the payload, 7 lower bits, to the result.
        payload_bits = byte & 0b111_1111
        result |= payload_bits << offset

        # This is the last byte if its most significant bit is 0.
        if byte & 0b1000_0000 == 0:
            return result
    else:
        raise ValueError(
            "Varint is too long, most significant bit in 5th byte is set"
        )


def write_unsigned_varint(value: int, buffer: BinaryIO) -> None:
    if value < 0 or value > 2**31 - 1:
        raise ValueError(f"Value {value} is out of range for UNSIGNED VARINT")

    written = False  # has at least one byte been written?
    while not written or value > 0:
        byte_to_write = value & 0b111_1111  # 7 lower bits
        value = value >> 7
        # Add the bit that signifies that more is to come.
        if value > 0:
            byte_to_write |= 0b1000_0000
        buffer.write(byte_to_write.to_bytes(1, byteorder="big", signed=False))
        written = True
UUID
UUID are 128-bit values used for uniquely identifying entities. For example, they are used to pass topic IDs in CreateTopicsResponse.
You can see how they are read and written in the Kafka code. It’s simple to reproduce:
def read_uuid(buffer: BinaryIO) -> UUID | None:
    byte_value: bytes = read_exact(buffer, 16)
    if byte_value == UUID_ZERO.bytes:
        return None
    else:
        return UUID(bytes=byte_value)


def write_uuid(value: UUID | None, buffer: BinaryIO) -> None:
    if value is None:
        buffer.write(UUID_ZERO.bytes)
    else:
        buffer.write(value.bytes)
Note that Kafka treats null/None as zero UUID, so we’re doing the same here.
Strings
The Kafka protocol has 4 types of strings:
| compact | non-compact | |
|---|---|---|
| nullable | COMPACT_NULLABLE_STRING |
NULLABLE_STRING |
| non-nullable | COMPACT_STRING |
STRING |
Compactness indicates whether the string length is encoded with INT16 or with UNSIGNED_VARINT. It depends on the message version (it was introduced around 2017). Nullability is whether the value can be null. It depends on the message purpose and the version as well (sometimes string fields become optional during the protocol evolution).
Strings are ubiquitous in the protocol. For example, see the field name in the generated class MetadataRequestData.MetadataRequestTopic.
Strings are encoded pretty straightforwardly: first goes the length and then comes the UTF-8 encoded body. The maximum allowed length is 32767 bytes. Null strings have the length of -1 and obviously no body.
As the only difference between compact and non-compact is how the string length is encoded, we can have one function for both modes.
Let’s start with reading and writing nullable strings:
def read_string_length(buffer: BinaryIO, compact: bool) -> int:
    # In the compact variant, stored lengths are increased by 1
    # to preserve unsignedness.
    length: int
    if compact:
        length = read_unsigned_varint(buffer) - 1
    else:
        length = read_int16(buffer)
    if length < -1 or length > 2**15 - 1:
        raise ValueError(f"string has invalid length {length}")
    return length


def read_nullable_string(buffer: BinaryIO, compact: bool) -> str | None:
    length = read_string_length(buffer, compact)
    if length == -1:
        return None
    else:
        return read_exact(buffer, length).decode(encoding="utf-8")


def write_string_length(length: int, buffer: BinaryIO, compact: bool) -> None:
    if length > 2**15 - 1:
        raise ValueError(f"string has invalid length {length}")

    # In the compact variant, stored lengths are increased by 1
    # to preserve unsignedness.
    if compact:
        write_unsigned_varint(length + 1, buffer)
    else:
        write_int16(length, buffer)


def write_nullable_string(value: str | None, buffer: BinaryIO, compact: bool) -> None:
    if value is None:
        write_string_length(-1, buffer, compact)
    else:
        value_b = value.encode(encoding="utf-8")
        write_string_length(len(value_b), buffer, compact)
        buffer.write(value_b)
Non-nullable string functions can be built on top of these:
def read_string(buffer: BinaryIO, compact: bool) -> str:
    result = read_nullable_string(buffer, compact)
    if result is None:
        raise ValueError("Non-nullable field was serialized as null")
    return result


def write_string(value: str, buffer: BinaryIO, compact: bool) -> None:
    write_nullable_string(value, buffer, compact)
Byte arrays
Byte arrays are very similar to strings. They have the same potential nullability and compactness:
| compact | non-compact | |
|---|---|---|
| nullable | COMPACT_NULLABLE_BYTES |
NULLABLE_BYTES |
| non-nullable | COMPACT_BYTES |
BYTES |
They are also encoded in the same way: length + body. Naturally, the body is not treated as an UTF-8 string, but as an opaque byte array. The max length of a byte array is 2147483647;
You can find an example of bytes in the field metadata in the generated class JoinGroupRequestData.JoinGroupRequestProtocol.
def read_array_length(buffer: BinaryIO, compact: bool) -> int:
    # In the compact variant, stored lengths are increased by 1
    # to preserve unsignedness.
    if compact:
        return read_unsigned_varint(buffer) - 1
    else:
        return read_int32(buffer)


def read_nullable_bytes(buffer: BinaryIO, compact: bool) -> bytes | None:
    length = read_array_length(buffer, compact)
    if length < -1 or length > 2**31 - 1:
        raise ValueError(f"bytes has invalid length {length}")

    if length == -1:
        return None
    else:
        return read_exact(buffer, length)


def write_array_length(length: int, buffer: BinaryIO, compact: bool) -> None:
    if length > 2**31 - 1:
        raise ValueError(f"bytes has invalid length {length}")

    # In the compact variant, stored lengths are increased by 1
    # to preserve unsignedness.
    if compact:
        write_unsigned_varint(length + 1, buffer)
    else:
        write_int32(length, buffer)


def write_nullable_bytes(value: bytes | None, buffer: BinaryIO, compact: bool) -> None:
    if value is None:
        write_array_length(-1, buffer, compact)
    else:
        write_array_length(len(value), buffer, compact)
        buffer.write(value)
As you can see, the difference between these functions and the corresponding functions for strings is small.
Other arrays
The protocol supports arrays of types other than bytes: strings, numbers, structs (but not nested arrays): ARRAY and COMPACT_ARRAY. Compactness is the same as in byte arrays and strings.
Nullability is not explicitly mentioned in the protocol specification for some reason. However, arrays can be nullable. This is controlled by nullableVersions in the schema definitions, like here.
Considering we already implemented read_array_length and write_array_length, let’s implement the reader and writer functions:
def read_array(
    read_element: Callable[[BinaryIO], T], buffer: BinaryIO, compact: bool
) -> list[T]:
    result = read_nullable_array(read_element, buffer, compact)
    if result is None:
        raise ValueError("Non-nullable field was serialized as null")
    return result


def write_array(
    array: list[T],
    write_element: Callable[[T, BinaryIO], None],
    buffer: BinaryIO,
    compact: bool,
) -> None:
    write_nullable_array(array, write_element, buffer, compact)


def read_nullable_array(
    read_element: Callable[[BinaryIO], T], buffer: BinaryIO, compact: bool
) -> list[T] | None:
    length = read_array_length(buffer, compact)
    if length == -1:
        return None
    else:
        array = []
        for _ in range(length):
            array.append(read_element(buffer))
        return array


def write_nullable_array(
    array: list[T] | None,
    write_element: Callable[[T, BinaryIO], None],
    buffer: BinaryIO,
    compact: bool,
) -> None:
    if array is None:
        write_array_length(-1, buffer, compact)
    else:
        write_array_length(len(array), buffer, compact)
        for el in array:
            write_element(el, buffer)
RECORDS
RECORDS encode Kafka records. The structure is pretty complex and I’m not going to describe it in this guide (however, please let me know in the comments 👇️ if you would like to have it.) For simplicity, we can treat records as NULLABLE_BYTES or COMPACT_NULLABLE_BYTES (depending on the message version).
Tagged fields
Tagged fields are an extension to the Kafka protocol which allows optional data to be attached to messages. The idea is twofold:
- If the client of service doesn’t understand the tagged field, it’ll save it as unknown and ignore it.
- If a field is rarely used, its default value can be skipped from transferring.
Have a look, for instance, at this field. It has taggedVersions, which says since which version this field is tagged (in most cases, it’s the same version when the field was added).
A tagged field consists of:
- The tag of the
UNSIGNED_VARINTtype. - The data of the
COMPACT_BYTEStype.
You can find more details about tagged fields in KIP-482.
Let’s implement:
@dataclass
class RawTaggedField:
    tag: int
    data: bytes

    @classmethod
    def read(cls, buffer: BinaryIO) -> RawTaggedField:
        tag = read_unsigned_varint(buffer)
        size = read_unsigned_varint(buffer)
        data = read_exact(buffer, size)
        return RawTaggedField(tag=tag, data=data)

    def write(self, buffer: BinaryIO) -> None:
        write_unsigned_varint(self.tag, buffer)
        write_unsigned_varint(len(self.data), buffer)
        buffer.write(self.data)


def read_unknown_tagged_fields(buffer: BinaryIO) -> list[RawTaggedField]:
    # As the tagged field array cannot be null,
    # we need to compensate the length shift that
    # `read_array_length` applies in the compact mode.
    size = read_array_length(buffer, True) + 1
    result = []
    for _ in range(size):
        result.append(RawTaggedField.read(buffer))
    return result


def write_unknown_tagged_fields(
    unknown_tagged_fields: list[RawTaggedField], buffer: BinaryIO
) -> None:
    # As the tagged field array cannot be null,
    # we need to compensate the length shift that
    # `write_array_length` applies in the compact mode.
    write_array_length(len(unknown_tagged_fields) - 1, buffer, True)
    for tf in unknown_tagged_fields:
        tf.write(buffer)
Here they are titled “unknown”. Known fields need to be made so inside their structures.
Message structure
The high-level message structure is very straightforward. According to the specification:
RequestOrResponse => Size (RequestMessage | ResponseMessage)
  Size => int32
That is, it’s a message itself preceded by its size in bytes. Both request and response messages consist of the header immediately followed by the body. For some reason, this isn’t explicitly documented4, but you can trust me 🙂 or check the code.
Request and response header
The request header exists in three versions: 0, 1, and 2. They are specified in the protocol as:
Request Header v0 => request_api_key request_api_version correlation_id
  request_api_key => INT16
  request_api_version => INT16
  correlation_id => INT32

Request Header v1 => request_api_key request_api_version correlation_id client_id
  request_api_key => INT16
  request_api_version => INT16
  correlation_id => INT32
  client_id => NULLABLE_STRING

Request Header v2 => request_api_key request_api_version correlation_id client_id TAG_BUFFER
  request_api_key => INT16
  request_api_version => INT16
  correlation_id => INT32
  client_id => NULLABLE_STRING
TAG_BUFFER is the tagged fields mentioned earlier.
Let’s implement them as Python data classes:
@dataclass
class RequestHeaderV0:
    request_api_key: int
    request_api_version: int
    correlation_id: int

    def write(self, buffer: BinaryIO) -> None:
        write_int16(self.request_api_key, buffer)
        write_int16(self.request_api_version, buffer)
        write_int32(self.correlation_id, buffer)


@dataclass
class RequestHeaderV1:
    request_api_key: int
    request_api_version: int
    correlation_id: int
    client_id: str

    def write(self, buffer: BinaryIO) -> None:
        write_int16(self.request_api_key, buffer)
        write_int16(self.request_api_version, buffer)
        write_int32(self.correlation_id, buffer)
        write_nullable_string(self.client_id, buffer, False)


@dataclass
class RequestHeaderV2:
    request_api_key: int
    request_api_version: int
    correlation_id: int
    client_id: str
    _unknownTaggedFields: list[RawTaggedField]

    def write(self, buffer: BinaryIO) -> None:
        write_int16(self.request_api_key, buffer)
        write_int16(self.request_api_version, buffer)
        write_int32(self.correlation_id, buffer)
        write_nullable_string(self.client_id, buffer, False)
        write_unknown_tagged_fields(self._unknownTaggedFields, buffer)
As you can see, there are some tagged fields in version 2, there are no expected known fields. If some tagged field is sent erroneously to the broker, it will be ignored.
The response header exists in two versions: 0 and 1. They are specified in the protocol as:
Response Header v0 => correlation_id
  correlation_id => INT32

Response Header v1 => correlation_id TAG_BUFFER
  correlation_id => INT32
Let’s also implement them:
@dataclass
class ResponseHeaderV0:
    correlation_id: int

    @classmethod
    def read(cls, buffer: BinaryIO) -> ResponseHeaderV0:
        return ResponseHeaderV0(correlation_id=read_int32(buffer))


@dataclass
class ResponseHeaderV1:
    correlation_id: int
    _unknownTaggedFields: list[RawTaggedField]

    @classmethod
    def read(cls, buffer: BinaryIO) -> ResponseHeaderV1:
        return ResponseHeaderV1(
            correlation_id=read_int32(buffer),
            _unknownTaggedFields=read_unknown_tagged_fields(buffer),
        )
We don’t implement read for the request headers and write for the response ones. This is for brevity: we’re not going to send response headers and receive the request ones in our examples as we’re not programming the server side. However, if you’re interested in the server side as well, you need to implement both functions (which should be straightforward).
Correlation ID
Note particularly the correlation_id field in the request and response headers. The protocol supports pipelining: the client can have more than one outstanding request per connection. The correlation ID allows it to match responses to requests.
Header version selection
Which version must be used is a function of the API key and message version. It’s not currently documented in the protocol guide explicitly5.
Use the requestHeaderVersion and responseHeaderVersion functions in the generated class ApiMessageType as the reference.
Sending requests and receiving responses
Now, having all this knowledge and code, let’s finally send an ApiVersions request and receive and read a response. ApiVersions is normally the first request that the client sends. It’s purpose is to find the API versions and features supported by the broker. We implement the latest version 3.
In the protocol specification, it’s defined as:
ApiVersions Request (Version: 3) => client_software_name client_software_version TAG_BUFFER
  client_software_name => COMPACT_STRING
  client_software_version => COMPACT_STRING
Let’s make the data class:
@dataclass
class ApiVersionsRequestV3:
    client_software_name: str
    client_software_version: str
    _unknownTaggedFields: list[RawTaggedField]

    def write(self, buffer: BinaryIO) -> None:
        write_string(self.client_software_name, buffer, True)
        write_string(self.client_software_version, buffer, True)
        write_unknown_tagged_fields(self._unknownTaggedFields, buffer)
And the response:
ApiVersions Response (Version: 3) => error_code [api_keys] throttle_time_ms TAG_BUFFER
  error_code => INT16
  api_keys => api_key min_version max_version TAG_BUFFER
    api_key => INT16
    min_version => INT16
    max_version => INT16
  throttle_time_ms => INT32
[api_keys] means “an array of api_keys”, where api_keys is the structure defined two lines below.
Converting this to Python data classes:
@dataclass
class ApiVersionsResponseApiKeyV3:
    api_key: int
    min_version: int
    max_version: int
    _unknownTaggedFields: list[RawTaggedField]

    @classmethod
    def read(cls, buffer: BinaryIO) -> ApiVersionsResponseApiKeyV3:
        return ApiVersionsResponseApiKeyV3(
            api_key=read_int16(buffer),
            min_version=read_int16(buffer),
            max_version=read_int16(buffer),
            _unknownTaggedFields=read_unknown_tagged_fields(buffer),
        )


@dataclass
class ApiVersionsResponseV3:
    error_code: int
    api_keys: list[ApiVersionsResponseApiKeyV3]
    throttle_time_ms: int
    _unknownTaggedFields: list[RawTaggedField]

    @classmethod
    def read(cls, buffer: BinaryIO) -> ApiVersionsResponseV3:
        return ApiVersionsResponseV3(
            error_code=read_int16(buffer),
            api_keys=read_array(ApiVersionsResponseApiKeyV3.read, buffer, True),
            throttle_time_ms=read_int32(buffer),
            _unknownTaggedFields=read_unknown_tagged_fields(buffer),
        )
When we speak about arrays, we need to know whether we need compact or non-compact ones. To find this out, let’s have a look at the schema definition in ApiVersionsRequest.json. You can see "flexibleVersions": "3+", which means that compact arrays are used starting from version 3 (more on this in README.md in the schema directory). Since we’re working with version 3 here, we use compact arrays.
Having the request and response classes implemented, we can send and receive these requests. For this ApiVersions v3 we need the v2 request header and the v0 response header (check the generated ApiMessageType.java). The API key (18) you can find in ApiVersionsRequest.json or in the protocol specification.
def send_request(request_correlation_id: int, sock: socket.socket) -> None:
    buffer = BytesIO()

    # message_size
    # will be filled later
    write_int32(0, buffer)

    header = RequestHeaderV2(
        request_api_key=18,
        request_api_version=3,
        correlation_id=request_correlation_id,
        client_id="test-client",
        _unknownTaggedFields=[],
    )
    header.write(buffer)

    message = ApiVersionsRequestV3(
        client_software_name="test-client",
        client_software_version="1",
        _unknownTaggedFields=[],
    )
    message.write(buffer)

    # Now we know the message size.
    # Return to the beginning of the buffer and put it there.
    request_message_size = buffer.tell() - 4
    buffer.seek(0)
    write_int32(request_message_size, buffer)

    sock.send(buffer.getvalue())


def receive_response(request_correlation_id: int, sock: socket.socket) -> None:
    # The first 4 bytes is the length.
    message_size = read_int32(BytesIO(sock.recv(4)))
    buffer = BytesIO(sock.recv(message_size))

    header = ResponseHeaderV0.read(buffer)
    if header.correlation_id != request_correlation_id:
        raise ValueError()
    pprint(header)

    message = ApiVersionsResponseV3.read(buffer)
    pprint(message)


def main() -> None:
    sock = socket.socket(socket.AF_INET, socket.SOCK_STREAM)
    sock.connect(("127.0.0.1", 9092))

    request_correlation_id = 123
    send_request(request_correlation_id, sock)

    receive_response(request_correlation_id, sock)

    sock.close()


if __name__ == "__main__":
    main()
If you run this code, you will see the response header and message printed in the console. Congratulations, you’ve performed a correct network exchange with the Kafka broker!
You will notice three tagged fields put in _unknownTaggedFields. The read and write methods of the generated ApiVersionsResponseData class and also the message definition in ApiVersionsResponse.json will help you to interpret them. Consider this homework 🙂
-
In my day job, we developed an open source library Kio. It allows us to do arbitrary Kafka API calls from Python easily. The serialization /deserialization code, like in Kafka itself, is generated from the JSON protocol definitions. The generated code is rigorously tested, including property testing against real Java Kafka code. ↩︎
-
Or “message” if you like: some of the schemas are not for API, but e.g. for on-disk data. ↩︎
-
The
read_exactfunction has a drawback that it duplicates the data when the underlying buffer is already in memory. However, it’s more convenient for education purposes. ↩︎