Publishing JARs to Bintray with Maven and SBT
Update 26.03.2023: In February 2021, Bintray was shut down. This post still may be useful from the point of view of artifact publishing in Maven and SBT.
Many developers are interested in making their JVM artifacts (e.g. libraries) available for others. Probably, the simplest way to do this is to publish an artifact to Bintray, which gives free hosting for publicly available artifacts. Also, some teams would like to have private repositories for their shared JARs. In this case, Bintray can help as well.
In this post:
- Setting up a Bintray repository.
- Publishing JARs of a Maven project to Bintray, including sources, Javadoc and tests.
- Publishing JARs of an SBT project to Bintray +
sbt-bintrayplugin.
All the code used in this project is available in bintray-hello-world Github repository.
Simple Maven project
Let’s create a rather simple Maven project, which then we will publish to Bintray. If you want to publish an existing project, align accordingly.
I will use archetypes to generate the project skeleton (if you are not familiar with Maven archetypes, check Introduction to Archetypes page):
$ mvn archetype:generate \
  -DarchetypeArtifactId=maven-archetype-quickstart \
  -DgroupId=me.ivanyu.bintrayhelloworld \
  -DartifactId=bintray-hello-world-java \
  -Dversion=1.0
Note the artifact ID bintray-hello-world-java, we will use it later.
It would be nice to provide some additional information in pom.xml, particularly the information about organization, licenses, SCM (source control management) and developers:
<organization>
	<name>me.ivanyu.bintrayhelloworld</name>
	<url>https://github.com/ivanyu/bintray-hello-world</url>
</organization>
<licenses>
	<license>
		<name>Apache License, Version 2.0</name>
		<url>https://www.apache.org/licenses/LICENSE-2.0</url>
		<distribution>repo</distribution>
	</license>
</licenses>
<scm>
	<connection>
		scm:git:git://github.com/ivanyu/bintray-hello-world.git
	</connection>
	<url>
		https://github.com/ivanyu/bintray-hello-world
	</url>
</scm>
<developers>
	<developer>
		<id>ivanyu</id>
		<name>Ivan Yurchenko</name>
		<email>[email protected]</email>
	</developer>
</developers>
Now, let’s add a very simple class to this project:
package me.ivanyu.bintrayhelloworld;

public class BintrayHelloWorldJava
{
    public static void say()
    {
        System.out.println("[Java] Hello World from Bintray!");
    }
}
Now we want to use this class in another project (or let other developers use it easily). To do so, we can publish a JAR file made from this project to Bintray.
Bintray preparations
In order to upload a JAR file to Bintray, we need to make some preparations:
- We need to create a repository, which is a container of artifacts of a particular type, e.g. Maven, Docker, NPM, Debian package files (Maven in our case).
- We need to create a package inside the repository, which is the logical representation of our artifact and its versions.
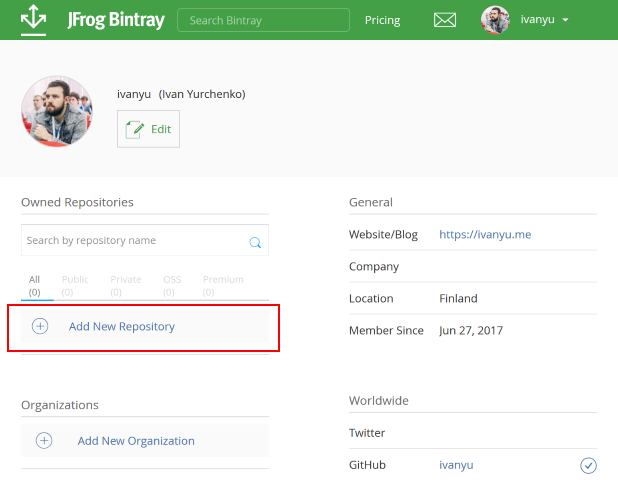
First off, log in to Bintray (you can do this with a Github account or in other ways). Then, on the home screen click “Add New Repository”:

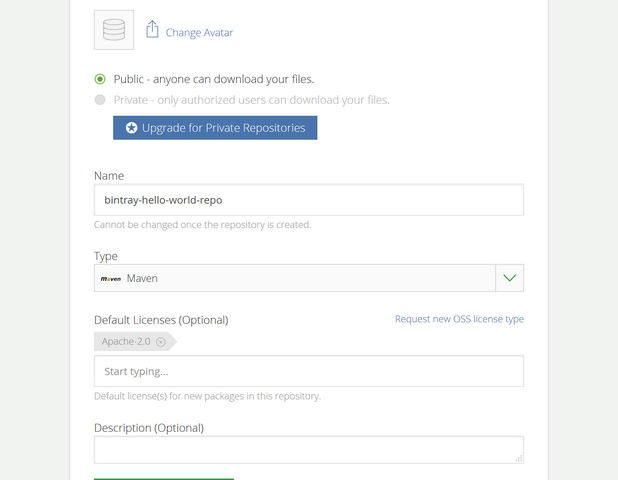
On the next screen, enter the details of the repository. Two of them are essential: Name (I will use bintray-hello-world-repo) and Type (must be Maven).

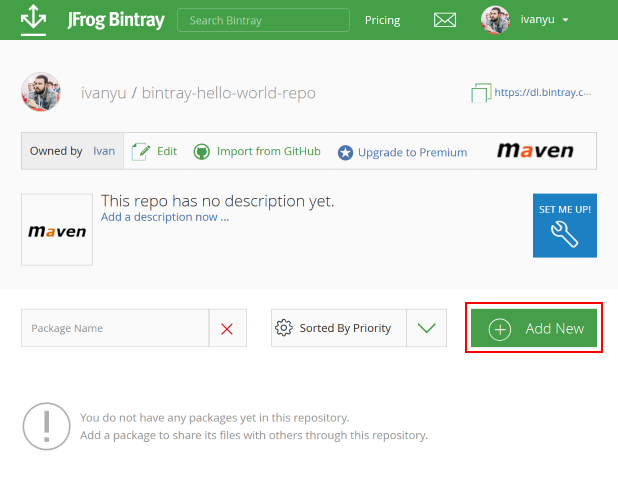
The repository has been created and you can access it now. On the repository screen https://bintray.com/ivanyu/bintray-hello-world-repo in my case) there is the list of packages (none for now) and the button to create a package, click it:

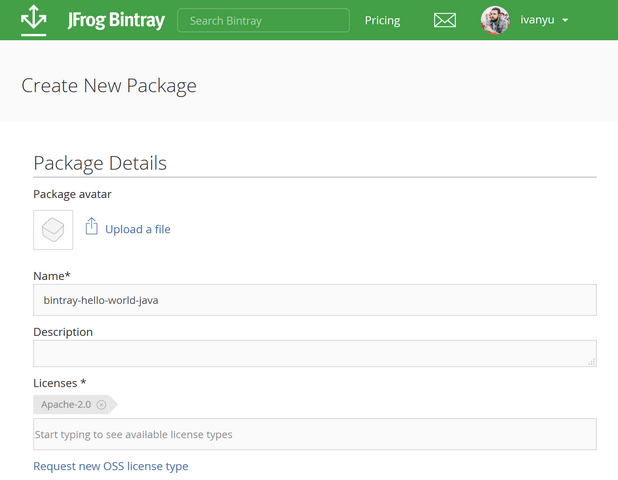
The next screen is for the details of the new package. One is important for us here, Name. I made it the same as the artifact ID, which is bintray-hello-world-java.

After creating of the package it can be accessed (the link is https://bintray.com/ivanyu/bintray-hello-world-repo/bintray-hello-world-java in my case).
The Bintray repository and the package in it are now created, and we can upload our artifact with Maven.
A note on jCenter
jCenter is a public Maven repository provided by Bintray, analogous to Maven Central. You can easily add you package to it by clicking on “Include My Package” on its page.
A note on GPG signing
Bintray allows users to sign their uploaded artifacts using GPG with its own private key, or with a private key provided by the user. Signing artifacts is a good practice (and it is mandatory if you want to automatically transfer your artifacts to Maven Central). Description of this process is out of the scope of this post, but it is quite straightforward and is described in the documentation.
Publishing with Maven
We need to configure our project to enable Maven to publish the artifact created by it to Bintray. It is easy to do, just a tiny modification of pom.xml is needed. If you click on “Set me up!” button on the package page and go to “Uploading” → “Deploying with Maven”, you will see distributionManagement that needs to be added to the project definition in pom.xml. Also, there will be server settings to add to settings.xml. settings.xml is a Maven settings file, you can read more about it on Settings Reference page. password is your Bintray API key that can be found in the profile edit page.
After doing adding this data, you can try to publish the artifact:
$ mvn deploy
If everything is successful, you will see the newly uploaded version on the package page in Bintray.
Maven uses maven-release-plugin for publishing JARs (enabled by default). Once I faced a situation in which the default version of this plugin did not work well with Bintray (other times it was quite fine). A message like Failed to deploy artifacts: Could not find artifact ... is an indication of this problem. Changing the version of the plugin to 2.4.2 helped me:
<build>
	<plugins>
		<plugin>
			<artifactId>maven-release-plugin</artifactId>
			<version>2.4.2</version>
		</plugin>
	</plugins>
</build>
Moreover, you may want to publish sources and Javadoc JARs along with the main JAR. To do so, maven-source-plugin and/or maven-javadoc-plugin need to be configured. Add these lines to pom.xml:
<build>
    <plugins>
        <plugin>
            <artifactId>maven-source-plugin</artifactId>
            <executions>
                <execution>
                    <id>attach-sources</id>
                    <phase>package</phase>
                    <goals><goal>jar-no-fork</goal></goals>
                </execution>
            </executions>
        </plugin>
        <plugin>
            <artifactId>maven-javadoc-plugin</artifactId>
            <executions>
                <execution>
                    <id>attach-javadocs</id>
                    <phase>package</phase>
                    <goals><goal>jar</goal></goals>
                </execution>
            </executions>
        </plugin>
    </plugins>
</build>
Another thing one might want to publish is a JAR with test files. maven-jar-plugin is what needs to be configured in this case:
<plugin>
    <groupId>org.apache.maven.plugins</groupId>
    <artifactId>maven-jar-plugin</artifactId>
    <executions>
        <execution>
            <goals><goal>test-jar</goal></goals>
        </execution>
    </executions>
</plugin>
Using the published artifact
Now the artifact is in Bintray and is accessible for other projects. The example of an application that uses our artifact is here. Let’s recreate it. To add the artifact to a project, first add repositories section to the project definition in pom.xml:
<repositories>
    <repository>
        <id>bintray-ivanyu-bintray-hello-world-repo</id>
        <url>http://dl.bintray.com/ivanyu/bintray-hello-world-repo</url>
    </repository>
</repositories>
And then add a dependency:
<dependencies>
    <dependency>
        <groupId>me.ivanyu.bintrayhelloworld</groupId>
        <artifactId>bintray-hello-world-java</artifactId>
        <version>1.0</version>
    </dependency>
</dependencies>
Now, everything is ready (refresh project definition after modifying pom.xml if you are using an IDE) and we can try to use BintrayHelloWorldJava class:
BintrayHelloWorldJava.say();The output will be as expected:
[Java] Hello World from Bintray!You can find a more sophisticated repository configuration (you may need it if you are developing a Maven plugin, for example) by clicking the same “Set me up!” button on the package page and going to “Downloading”.
Publishing with SBT
SBT is a default Scala build tool. As well as Maven, it is capable of publishing artifacts to Bintray. Let me show you how to do this.
First, let’s create a new SBT project. Start from a very simple build.sbt:
organization := "me.ivanyu.bintrayhelloworld"
name := "bintray-hello-world-scala"

version := "1.0"

scalaVersion := "2.12.3"

licenses := List(
  ("Apache License, Version 2.0",
    url("https://www.apache.org/licenses/LICENSE-2.0"))
)
homepage := Some(url("https://github.com/ivanyu/bintray-hello-world"))

pomExtra :=
  <scm>
    <connection>
      scm:git:git://github.com/ivanyu/bintray-hello-world.git
    </connection>
    <url>
      https://github.com/ivanyu/bintray-hello-world
    </url>
  </scm>
  <developers>
    <developer>
      <id>ivanyu</id>
      <name>Ivan Yurchenko</name>
      <email>ivan0yurchenko@gmail.com</email>
    </developer>
  </developers>
I included the additional information the same as in the Maven project. This information will be transferred to the output pom.xml.
Then add BintrayHelloWorldScala object, analogous to BintrayHelloWorldJava:
package me.ivanyu.bintrayhelloworld

object BintrayHelloWorldScala {
  def say(): Unit = {
    println("[Scala] Hello World from Bintray!")
  }
}
Create a file .credentials in the SBT configuration directory (~/.sbt/.credentials) with the following content:
realm=Bintray API Realm
host=api.bintray.com
user=<username>
password=<api_key>
And now let’s modify build.sbt by adding the following lines:
publishTo := Some(
  "bintray" at
    "https://api.bintray.com/maven/ivanyu/" +
      "bintray-hello-world-repo/bintray-hello-world-scala/;publish=1")
credentials += Credentials(Path.userHome / ".sbt" / ".credentials")
publishMavenStyle := true
Now we can publish:
$ sbt publish
In contrast to Maven, SBT publishes sources and Javadoc JARs by default. To alter this behaviour, packagedArtifacts option exists. We can filter out artifacts we don’t want to be published:
packagedArtifacts in publish ~= { m =>
  val classifiersToExclude = Set(
    Artifact.SourceClassifier,
    Artifact.DocClassifier
  )
  m.filter { case (art, _) =>
    art.classifier.forall(c => !classifiersToExclude.contains(c))
  }
}
The same way as Maven, SBT doesn’t include the test JAR by default. If you want to do this, you need to set:
publishArtifact in Test := truesbt-bintray
SBT has a convenient plugin to work with Bintray: sbt-bintray. I am not going to describe how to use it, because it has a great README.